
The Lenovo Smart Display has an impressive array of abilities (we gush about it in our review). As a screened smart speaker, it’s the Google Assistant competitor to the Amazon Echo Show. The Lenovo Smart Display’s functions include making video calls and a touchscreen, but you’ll want to set it up properly to make the most of it.
From connecting your device to the Google Home app to adding new services, we have all the info you need to get your Lenovo Smart Display set up and ready-to-use right away.
The smart display is designed to work with the Google Home app. If you already have the Google Home app downloaded for another device, you don’t need to worry about this step. But if you don’t have it, then you need to get the Google Home app and sign in with your Google Account login before you begin. Don’t worry, you don’t need to have a Chromecast or Google Home device for this to work, the Home app will naturally pair with your display. The Home App works on tablets, phones, or computers.
With your Google Home ready to go, unbox your Lenovo, plug it in, and turn it on. The opening screen will instruct you back to the Google Home app, and the device and app will provide you with instructions from there.
You should now see a new notification that says 1 Device found and a prompt to Set up. Select the prompt to begin. You may need to wait a couple of minutes for the notification to appear.
Your Google Home app will now display a short code with the message See the code? while your Smart Display will go to a setup screen and show its own four-digit code. Check the codes on both of your devices to make sure that they match. This helps stop Home from accidentally pairing with the wrong device or a neighbor’s smart display. In the bottom right of the Google Home app, you’ll see a Yes option. Select the Yes to pair the two devices and continue.
Now, Google Home will ask you a number of questions about Lenovo display so you can create basic settings for the device. These steps are simple enough but very important for configuring the smart display, so we’re going to go over them one at a time.
Now, Google will take you through yet another list of questions and forms. These are more directed at how Google Assistant performs and what tasks the Lenovo can carry out. This part is a bit more involved, so we’ll walk you through the details.
You should be finished now. When done, your smart display should switch to an intro scene, then a general info screen. Test out Google Assistant by saying, “Hey, Google” or “Ok, Google” and asking a question or playing a movie or song, just to make sure everything is working as intended. You may also want to check out some of the other ways you can personalize Google Assistant.
Now that your display is on, you should end by adjusting the settings, so it behaves the way you want it to. The touchscreen should be familiar if you’ve used touchscreens before, but keep in mind that you can swipe from the left edge to the right to return to your previous screen, which is especially handy when making changes.
If you swipe upward from the bottom of the screen, you will access a quick settings menu that’s worth a look as soon as you ready to start using the display. The sun icon will allow you to adjust the screen brightness, and the speaker will adjust the volume. Set them both to a level that you find suitable. Also note the circle-and-line icon: This allows you to enable or disable the do not disturb function, handy for quieting the display down when you are napping, etc. You can also select the cog icon to expand the settings menu.
Did something go wrong with your display? You can factory reset at any time by holding the volume up and volume down buttons at the same time for several seconds. However, this means you’ll have to go through the setup process again.
Lenovo also has a smart clock that’s very similar to its smart display. In fact, you can use this set of instructions to set up the smart clock as well. The main difference is that the smart clock is a bit more limited in what it can do, so setup is a bit faster. You cannot watch videos or make calls using the smart clock, but you do have access to the other Google Assistant services.
Related Posts
Top Smart Home Upgrades Worth Making Before Your Summer Break
Modern smart home technology makes those situations easier to manage. Today's connected devices can do far more than record footage or send motion alerts. They can help homeowners monitor outdoor spaces around the clock, stay informed about important activity, communicate with visitors remotely, and manage entry without needing to be physically present. Instead of constantly checking in or wondering whether everything is running smoothly back home, the right setup can provide greater visibility, convenience, and peace of mind throughout the season.
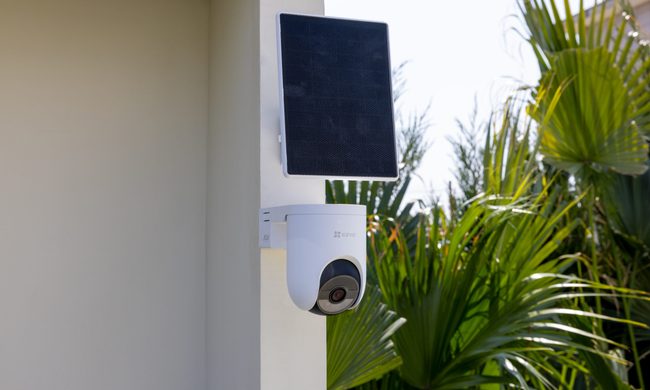
EZVIZ Sets a New Benchmark for Battery Powered Home Surveillance
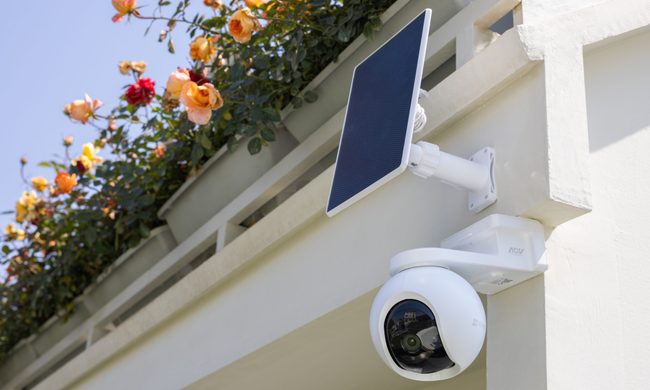
This shift has also raised expectations. Modern users want more than clear video. They expect smart detection, reliable monitoring, seamless smart home integration, and solutions that adapt to different property sizes and lifestyles. As one of the world's leading smart home camera brands, EZVIZ has responded by building one of the industry's most comprehensive portfolios of battery-powered cameras. The lineup is designed to serve every living situation, whether for renters or owners of apartments, condominiums, or villas. From accessible options for everyday monitoring to advanced multi-lens systems for larger and more demanding environments, the portfolio reflects a strong focus on innovation, user-centric design, and real-world needs.
Beatbot AquaSense X review: The pool cleaner for those that want to be pampered
Quick take: